Your Cart is Empty

Hound Heater Mounting Bracket
$19.95
The Akoma mounting bracket provides a secure and reliable way to install the Hound Heater Deluxe, Hound Heater with Wi-Fi Control and Built-in Camera, or the Heat-N-Breeze system in igloo-style dog houses. All necessary mounting hardware is included for easy installation.
Looking to explore more options? Check out our full...
-
The Akoma mounting bracket provides a secure and reliable way to install the Hound Heater Deluxe, Hound Heater with Wi-Fi Control and Built-in Camera, or the Heat-N-Breeze system in igloo-style dog houses. All necessary mounting hardware is included for easy installation.
Looking to explore more options? Check out our full lineup of Akoma products, including heaters, coolers, and accessories, designed to keep your pet comfortable year-round.
Akoma Mounting Bracket Specifications
- Weight: 2.8 lbs
- Dimensions: 14" x 12" x 3"
- Durability: Built with sturdy materials to securely hold your heater or cooling system in place.
Mount Bracket Compatibility
Installation Instructions
-
Prepare the Heater and Bracket: Lay the heater flat with the back side facing up. Align the mounting bracket toward the bottom of the heater. Use the included hardware to attach the bracket to the heater as shown.
-
Choose the Perfect Spot: Next, find the ideal location for the heater inside your igloo-style doghouse. We recommend holding the heater/bracket assembly on the interior wall, closer to the floor. Slide the unit upwards until the heater is fairly vertical, making sure it's positioned at least 12” above the floor.
-
Mark and Drill Holes: Once you're satisfied with the placement, mark the four corner holes. Use an 8/32” bolt and a 1/8” drill bit to drill the appropriate holes. Additionally, drill a 1 ¼” hole for the power cord to pass through the wall of the igloo.
-
Secure the Heater: After drilling the holes, secure the heater in place using nuts and bolts (screws are not recommended for this installation). Ensure that the heater is firmly mounted for maximum safety and efficiency.
Learn More About Heating Your Doghouse or Kennel
For more tips on how to properly heat your pet’s shelter, check out our Heating Your Doghouse or Kennel blog. It covers everything from choosing the right heater to installation and maintenance, helping you create a safe, comfortable environment for your pet.
-


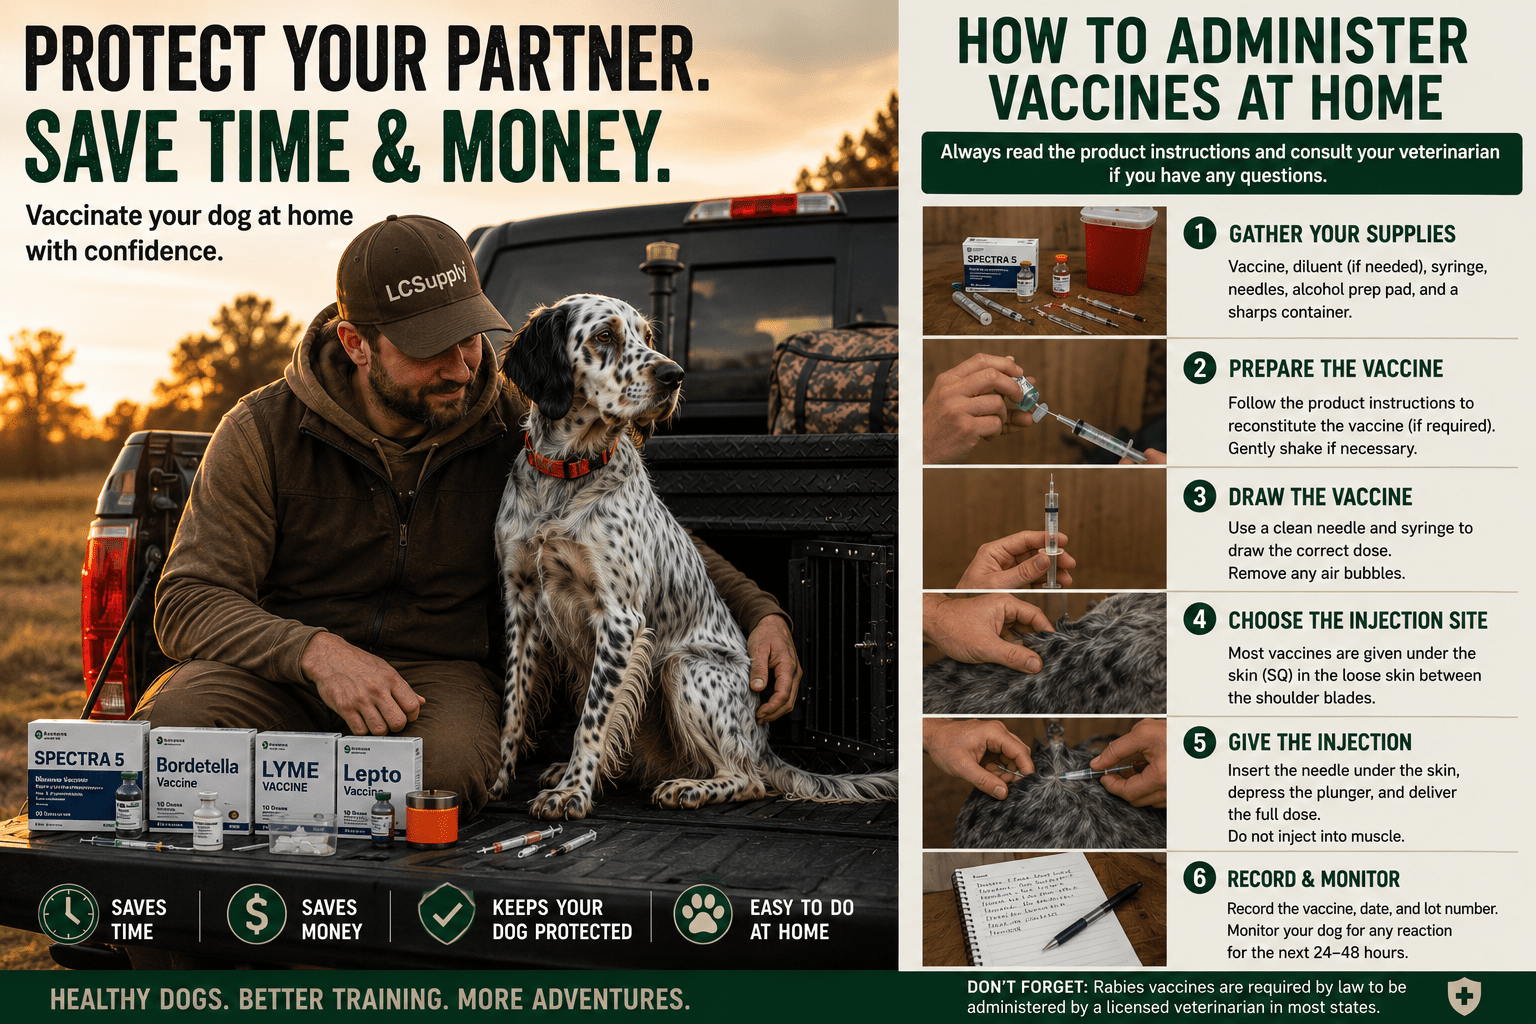

Vaccinating Your Hunting Dog at Home: A Simple Guide from Puppy to Adult
Keeping your hunting dog healthy is one of the most important investments you can make in their future. Whether you're raising a new puppy, preparing for hunt tests, or maintaining an experienced bird dog, staying current on vaccinations helps protect your dog from preventable diseases and keeps them ready for training, travel, and hunting season.

Bird Dog Training for Beginners
You have decided to train your bird dog. Fantastic! Here are some tips for beginners. Puppies! It's easy to fall in love with a pretty face. However, when training a bird dog, it makes good sense to start off with the appropriate puppy. Decide, before you even start, if you want a pointer or a retriever. Starting young...

How to Keep Your Hunting Dog Safe in Warm Weather (And What to Pack in the Field)
Warm-weather hunts can be some of the best days in the field—but they also come with real risks for your dog. Unlike us, dogs don’t sweat to regulate body temperature. They rely on panting, and when they’re running hard, that system can get overwhelmed fast.

